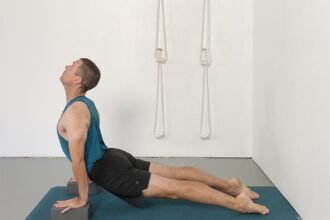
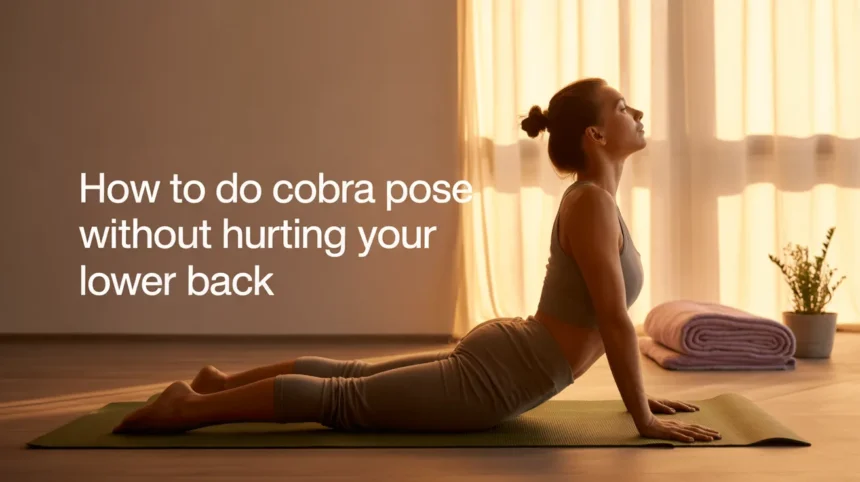
Cobra Pose, or Bhujangasana, is one of yoga’s most iconic backbends. It opens the chest, strengthens the spine, and energizes the body. Yet, many beginners experience lower back discomfort or pain when attempting this pose.
- What Is Cobra Pose (Bhujangasana)?
- Why Cobra Pose Can Hurt Your Lower Back
- Overarching the Lumbar Spine
- Locked or Hyperextended Elbows
- Weak Core and Glutes
- Poor Hip and Leg Engagement
- Lifting Too High Too Fast
- Anatomy of a Safe Cobra Pose
- Step-by-Step: How to Do Cobra Pose Without Hurting Your Lower Back
- Step 1: Get Into Position
- Step 2: Engage Core and Legs
- Step 3: Lift Using Your Upper Back
- Step 4: Lengthen Before You Lift Higher
- Step 5: Hold and Breathe
- Step 6: Exit Safely
- Alignment Cues That Protect Your Lower Back
- Cobra Pose Modifications for Sensitive Lower Backs
- 1. Baby Cobra (Low Cobra)
- 2. Sphinx Pose
- 3. Blanket or Cushion Under Hips
- 4. Wider Leg Position
- 5. Gradual Lift with Breath
- Mistakes to Avoid
- Who Should Avoid or Modify Cobra Pose?
- Benefits of Cobra Pose When Done Correctly
- Cobra Pose vs Upward Facing Dog: Key Differences
- How Long Should You Hold Cobra Pose?
- When to Practice Cobra Pose
- Sample Mini Routine to Protect Your Lower Back
- Final Thoughts
This usually happens due to common mistakes such as overarching the lower back, locking the elbows, or pushing too high too soon.
In this article, you’ll learn how to practice Cobra Pose safely and effectively, with tips on alignment, gradual progression, and modifications that protect your lower back while still giving you the benefits of the pose.
What Is Cobra Pose (Bhujangasana)?
Bhujangasana comes from the Sanskrit words “bhujanga” (cobra) and “asana” (pose), inspired by the graceful, raised hood of a cobra. It is a staple in Hatha and Vinyasa yoga and often appears in Sun Salutations as a gentle backbend between poses.
Cobra Pose offers multiple benefits:
- Strengthens the spine, shoulders, and arms
- Opens the chest and lungs
- Improves posture and spinal flexibility
- Can help relieve mild stress and fatigue
It’s important to understand the difference between a gentle backbend and a deep backbend:
- Gentle backbend: The lift comes from engaging the upper back and lengthening the spine, with minimal compression in the lower back.
- Deep backbend: Requires more flexibility and strength; beginners attempting this too soon can strain the lumbar region.
Why Cobra Pose Can Hurt Your Lower Back
Even though Cobra Pose is gentle when done correctly, certain habits can cause strain or discomfort in the lower back. Understanding these common pitfalls can help you protect your spine.
Overarching the Lumbar Spine
Many beginners dump weight into the lower back, trying to lift too high. Without core engagement, this compresses the lumbar spine and can lead to pain or stiffness.
Locked or Hyperextended Elbows
Pushing into the floor with locked elbows forces your spine to compensate, creating unnecessary tension. Progress gradually, and keep a slight bend if needed.
Weak Core and Glutes
Your core and glutes act as natural support for the spine. If these muscles are weak or disengaged, the lower back takes all the pressure during the backbend.
Poor Hip and Leg Engagement
Inactive legs or hips mean the spine bears more load than it should. Engaging the legs and gently grounding the pelvis distributes the effort safely.
Lifting Too High Too Fast
Trying to achieve a “deep backbend” too early is often ego-driven. Focus on gradual, controlled lifts rather than height to prevent overextension and injury.
Anatomy of a Safe Cobra Pose
A safe Cobra Pose relies on balanced spinal movement, muscle engagement, and proper alignment.
- Lumbar spine: Avoid collapsing here; use a gentle curve supported by core muscles.
- Thoracic extension: Most of your lift should come from the upper and mid-back, not just the lower spine.
- Core stabilizers: Engaging your abs protects the lumbar spine and creates a strong foundation.
- Glute activation: Slight engagement helps stabilize the pelvis without clenching.
- Shoulder positioning: Draw shoulders down and away from ears to prevent neck and upper back strain.
- Pelvis grounding: Keep your pelvis anchored to the mat to evenly distribute spinal pressure.
Step-by-Step: How to Do Cobra Pose Without Hurting Your Lower Back
Cobra Pose (Bhujangasana) can energize your body and open your chest—but only if practiced with proper alignment. Protecting your lower back is key. The following step-by-step guide will help you lift safely, engage the right muscles, and enjoy the benefits of the pose without discomfort. Focus on lengthening the spine, engaging your core, and using your upper back muscles rather than forcing a deep arch.
Step 1: Get Into Position
- Lie face down on your mat with legs extended hip-width apart.
- Place your hands under your shoulders, fingers spread wide for support.
- Rest your forehead lightly on the mat and relax your neck.
Step 2: Engage Core and Legs
- Press the tops of your feet and thighs into the mat.
- Draw your navel gently toward your spine to activate the core.
- Lightly engage your glutes to stabilize the pelvis and lower back.
Step 3: Lift Using Your Upper Back
- Slowly lift your chest, keeping elbows slightly bent.
- Draw your shoulders down and away from your ears.
- Focus on using the mid-back muscles for the lift, not just your arms or lower back.
Step 4: Lengthen Before You Lift Higher
- Think of stretching forward and upward, rather than pushing the lower back.
- Keep the pelvis grounded to prevent compression in the lumbar spine.
- Maintain a neutral neck and relaxed shoulders.
Step 5: Hold and Breathe
- Stay lifted for 3–5 slow breaths, keeping the chest open.
- Relax your face, jaw, and shoulders—avoid tensing anywhere.
Step 6: Exit Safely
- Slowly lower your chest back down with control.
- Rest for a moment before repeating or moving on to another pose.
Alignment Cues That Protect Your Lower Back
Cobra Pose can be wonderfully energizing, but protecting your lower back requires awareness and precise alignment. Instead of trying to lift as high as possible, focus on spinal length, controlled lift, and engaging the right muscles. Here are the most important cues to keep in mind:
- Lengthen before lifting – Imagine creating space along your spine first, extending from your tailbone to the crown of your head, before pressing your chest up. This prevents over-compression in the lower back.
- Keep your pubic bone grounded – Anchoring the pelvis stabilizes the lumbar spine and ensures that your lower back isn’t doing all the work.
- Lift from the heart, not the chin – Focus on raising your chest with your thoracic (mid-back) muscles rather than tipping your head back. This keeps your neck neutral and shoulders relaxed.
- Maintain slightly bent elbows – Fully locking your elbows can force your spine to overcompensate. Keep a gentle bend to protect joints and back.
- Spread your collarbones and open your chest – Imagine broadening the chest forward and out, which relieves tension in the shoulders and upper back.
- Engage core and glutes lightly – Activating these muscles provides natural support to your lumbar spine. Avoid tensing them too hard, which can actually worsen discomfort.
- Avoid compressing the lower spine – Always prioritize length and control over height. Feel the stretch along your upper and mid-back rather than letting your lumbar region bear the load.
Cobra Pose Modifications for Sensitive Lower Backs
If you have tightness, discomfort, or are new to backbends, these variations allow you to safely experience Cobra Pose while minimizing strain:
1. Baby Cobra (Low Cobra)
- Lift your chest only a few inches off the mat, keeping elbows bent.
- Focus on spinal elongation and activating your upper back instead of forcing height.
- Great for building strength gradually and preventing lumbar overload.
2. Sphinx Pose
- Rest on your forearms rather than your hands.
- This provides a gentler, more stable backbend, distributing the lift across the thoracic spine.
- Ideal for beginners or anyone with lower back sensitivity.
3. Blanket or Cushion Under Hips
- Place a folded blanket or yoga block under your pelvis.
- Reduces pressure on the lumbar spine and provides extra support, especially for longer holds.
4. Wider Leg Position
- Keep legs slightly apart rather than tightly together.
- Spreads the weight evenly and prevents compression in the lower back.
- Works well for beginners or those with limited flexibility in the spine and hips.
5. Gradual Lift with Breath
- Inhale as you slowly lift the chest, exhale to maintain support.
- Breathing consciously ensures your core remains engaged and spine supported.
Mistakes to Avoid
Even small misalignments can cause strain or pain. Watch out for these common pitfalls:
- Locking or straightening arms fully – Forces your spine and shoulders to overcompensate.
- Shrugging shoulders toward ears – Creates tension in the neck and upper back.
- Clenching glutes aggressively – Over-tightening can compress the lumbar spine instead of supporting it.
- Throwing the head back – Puts unnecessary pressure on the cervical spine. Keep the neck long and neutral.
- Holding your breath – Reduces spinal stability and increases tension. Focus on slow, even breathing.
- Rushing into a deep backbend – Ego-driven lifts lead to overextension and lower back pain.
- Ignoring pain signals – Sharp or sudden discomfort is your body’s warning; stop immediately.
By following these cues, modifications, and safety tips, you can enjoy the full benefits of Cobra Pose—stronger spine, opened chest, and energized body—without risking injury.
Who Should Avoid or Modify Cobra Pose?
While Cobra Pose is generally safe for most practitioners, certain conditions require caution, modifications, or skipping the pose altogether:
- Herniated disc – Deep backbends can aggravate spinal disc issues.
- Severe sciatica – Lifting the chest may increase nerve irritation.
- Pregnancy (later stages) – Lying on the stomach is unsafe; consult a prenatal yoga instructor for alternatives.
- Recent abdominal surgery – Core engagement could strain healing tissues.
- Acute lower back injury – Avoid backbends until cleared by a medical professional.
Tip: If you have any spinal, hip, or abdominal concerns, consult a healthcare provider or certified yoga instructor before attempting Cobra Pose. Gentle variations like Baby Cobra or Sphinx Pose are safer options for those with sensitivity.
Benefits of Cobra Pose When Done Correctly
Practiced with proper alignment and mindful engagement, Cobra Pose offers a wide range of physical and mental benefits:
- Strengthens spinal extensors – Builds support for the lower back and improves overall spinal health.
- Improves posture – Opens the chest and shoulders, counteracting the effects of prolonged sitting.
- Opens chest and shoulders – Enhances breathing capacity and upper-body flexibility.
- Enhances flexibility – Gently stretches the spine, abdomen, and hip flexors.
- Supports mild back pain relief – Strengthens muscles that stabilize the lower back.
- Boosts energy and alertness – A gentle backbend can invigorate the body, making it perfect for morning practice.
When performed safely, Cobra Pose can be a powerful addition to your yoga routine, providing both strength and flexibility while protecting your lower back.
Cobra Pose vs Upward Facing Dog: Key Differences
Although Cobra Pose (Bhujangasana) and Upward Facing Dog (Urdhva Mukha Svanasana) may look similar, they differ in alignment, intensity, and suitability for beginners. In Cobra, the elbows stay slightly bent, the legs remain on the mat, and the pelvis stays grounded, making it gentle and supportive for the lower back. Upward Dog, on the other hand, requires fully extended arms, lifted thighs and pelvis, and greater core and back strength, making it a more advanced pose. Cobra is safer for beginners because it emphasizes spinal length over height and reduces lumbar strain.
How Long Should You Hold Cobra Pose?
The duration of your Cobra Pose should reflect your experience level and comfort. Remember: quality is more important than holding time.
- Beginners: 3 slow, mindful breaths.
- Intermediate: 15–20 seconds with controlled lift.
- Advanced: Up to 30 seconds, maintaining alignment and core engagement.
Always focus on slow breathing, engaged core, and relaxed shoulders, rather than pushing for longer holds that could strain your back.
When to Practice Cobra Pose
Cobra Pose can fit naturally into different parts of your day and yoga sequences:
- Morning practice: Opens the chest, energizes the body, and awakens the spine.
- After sitting or working at a desk: Counteracts hunching and relieves stiffness.
- Back-focused yoga sequences: Strengthens spinal extensors and improves posture.
- Sun Salutations: Often included between Chaturanga and Downward Dog to create a flowing backbend transition.
Sample Mini Routine to Protect Your Lower Back
This short, gentle sequence helps warm up, strengthen, and stretch the spine safely:
- Cat–Cow (Marjaryasana–Bitilasana): Mobilizes the spine and warms up muscles.
- Sphinx Pose: Gentle backbend to activate thoracic muscles.
- Baby Cobra: Small chest lift to engage the upper back while protecting the lumbar region.
- Full Cobra: Gradual lift with proper alignment cues.
- Child’s Pose (Balasana): Counterpose to release tension and relax the spine.
Following this mini routine allows you to gradually build strength and flexibility, reduce lower back strain, and enjoy the benefits of Cobra Pose safely.
Final Thoughts
When practicing Cobra Pose, prioritize mindful movement and staying within a pain-free range of motion. Focus on proper alignment and controlled lifting rather than trying to reach maximum height, as this protects your lower back and builds sustainable strength. Engaging your core and keeping the pelvis grounded ensures that each repetition supports your spine safely.
Consistency is key. Even a few careful repetitions each day can improve spinal flexibility, posture, and overall energy levels. Listen to your body, move with intention, and enjoy the gentle progress you make—Cobra Pose is as much about awareness and care as it is about the backbend itself.